 Download Protocol PDF
Protocol |
Sample Type |
All samples |
|
All samples |
|
Plant and animal samples |
|
Animal samples |
|
Plant or fungal samples |
Reagents
For each group (for isolating DNA from 2 samples)
- Lysis solution (6 M Guanidine Hydrochloride GuHCl) (120 µL)
- Wash buffer (480 µL)
- TE buffer (75 µL)
- Specimen tissue sample(s) (from Part I)
- Whatman No.1 Chromatography paper discs (2, 3-mm diameter)
Shared Supplies and Equipment
- 6 Microcentrifuge tubes (1.5 mL)
- Micropipettes and tips (2–1000 µL)
- Permanent marker
- 2 Sterile plastic pestles
- Microcentrifuge tube rack
- 2 Sterile tweezers
- Possible: 2 Razor blades scissor, tweezer, or 2, 10-µL pipette tips for tissue removal from specimen
- For sample storage: 96–100% Ethanol or freezer
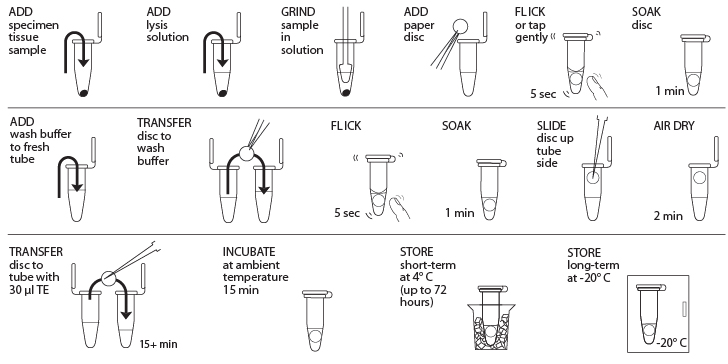
The rapid DNA extraction is inexpensive, fast, and does not require a water bath or centrifuge. It also works with many sample types.
- Obtain plant, fungal, or animal tissue ~10 mg or ⅛- to ¼-inch diameter by removing a piece of the tissue with a razor blade, clean tweezers, scissors, or back of a 10-µL pipette tip to enable efficient lysis. If you are working with more than one sample, be careful not to cross-contaminate specimens. (If you only have one specimen, make a balance tube with the appropriate volume of water for centrifugation steps.) Be sure to preserve the remainder of the organism at -20°C or in 96–100% Ethanol.
- Place tissue in a clean 1.5-mL tube labeled with a sample identification number.
- Add 50 µL of lysis solution to each tube.
- Twist a clean plastic pestle against the inner surface of 1.5-mL tube to forcefully grind the tissue for at least 2 minutes. Use a clean pestle for each sample. Ensure the sample is ground into fine particles.
- For each sample, use a separate sterile tweezer to add one 3-mm diameter disc of Whatman No. 1 Chromatography paper to the lysed extract. Tap or flick the tube gently to ensure the disc is fully submerged in the extract. Allow the disc to soak in the extract for 1 minute.
- While the disc is soaking, add 200 µL of wash buffer to a clean 1.5-mL tube labeled with the sample identification number.
- Remove the disc from the extract using a sterile tweezer or pipette tip and transfer the disc into the fresh tube containing wash buffer. Tap or flick the tube to mix for 5 seconds, then allow the disc to sit in the wash buffer for 1 minute.
- Use a sterile pipette tip to gently drag the disc out of the wash buffer and up the tube wall to dry at the top of the tube. Ensure that little to no debris is attached to the disk. Allow the disc to air dry for 2 minutes to evaporate the ethanol on the disc.
- While the disc is air-drying, add 30 µL of TE to a clean 1.5-mL tube labeled with the sample identification number.
- Once dry, carefully transfer the disc using a sterile tweezer or pipette tip into the fresh tube containing 30 µL of TE. Allow the disc to soak for a minimum of 15 minutes at ambient temperature (soaking the disc overnight at 4° C is optimal) to elute the purified DNA
- The disc in TE can be stored at 4° C temporarily or frozen at -20° C for long-term storage until ready to begin Part III; ensure that the disc has incubated at ambient temperature for at least 15 minutes before storage at 4° C or -20° C. In Part III, you will use 2 μL of DNA for each PCR reaction. This is a crude DNA extract and contains nucleases that will eventually fragment the DNA at room temperature. Keep the sample cold to limit this activity.
Tissue should be no larger than a grain of rice. Using more than the recommended amount can affect amplification.
Lysis solution dissolves membrane-bound organelles including the nucleus, mitochondria, and chloroplast..
Grinding breaks up cell walls and other tough material. Once ground, the sample should be liquid, but there may be some particulate matter remaining.
Whatman chromatography paper binds the DNA, helping separate DNA from contaminants.
Wash buffer will remove contaminants that can inhibit PCR while the DNA remains bound to the paper.
Discard/set-aside the tweezer following Step 7. Use of the tweezer to transfer the disc in future steps will contaminate the disc with impurities that may affect PCR.
Ethanol in the wash buffer can inhibit PCR, so drying the paper after the wash step is required.
Reagents
For each group (for isolating DNA from 2 samples)
- Lysis solution [6 M Guanidine Hydrochloride GuHCl] (720 µL)
- Silica resin (8 µL)
- Specimen tissue sample(s) (from Part I)
- Wash buffer (2400 µL)
- Distilled water or TE buffer (240 µL)
Shared Supplies and Equipment
- Container with cracked or crushed ice
- Microcentrifuge
- Microcentrifuge tube rack
- 6 Microcentrifuge tubes (1.5 mL)
- Micropipettes and tips (2–1000 µL)
- Permanent marker
- 2 Plastic pestles
- Vortexer (optional)
- Water bath or heating blocks at 65° C and 57° C
- Possible: 2 Razor blades, scissor, tweezer, or 2, 10-µL pipette tips for tissue removal from specimen
- For sample storage: 96–100% Ethanol or freezer
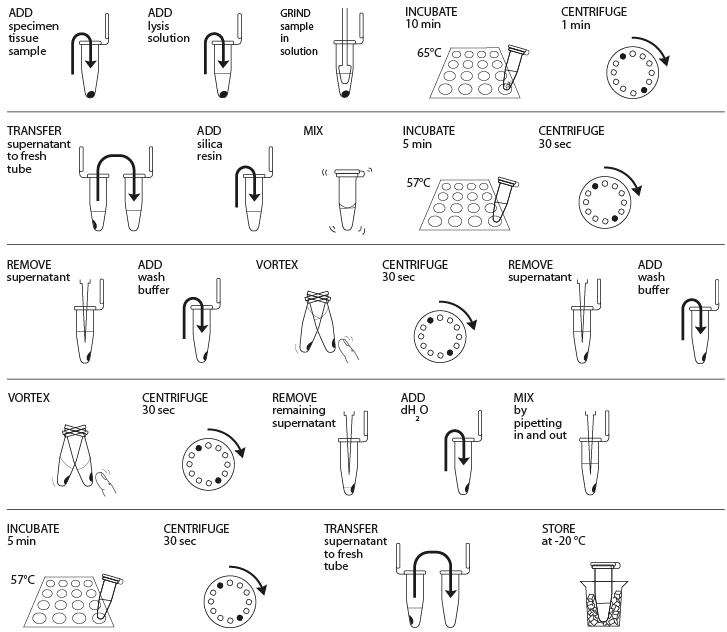
The silica DNA extraction method is inexpensive and has the advantage of working reproducibly with almost any kind of plant, fungus, or animal specimen.
- Obtain plant, fungal, or animal tissue ~10 mg or ⅛- to ¼-inch diameter by removing a piece of the tissue with a razor blade, clean tweezers, scissors, or back of a 10-µL pipette tip to enable efficient lysis. If you are working with more than one sample, be careful not to cross-contaminate specimens. (If you only have one specimen, make a balance tube with the appropriate volume of water for centrifugation steps.)
- Place sample in a clean 1.5-mL tube labeled with an identification number.
- Add 300 µL of lysis solution to each tube.
- Twist a clean plastic pestle against the inner surface of the 1.5-mL tube to forcefully grind the tissue for 2 minutes. Use a clean pestle for each tube if you are doing more than one sample.
- Incubate the tube in a water bath or heat block at 65° C for 10 minutes.
- Place your tube and those of other groups in a balanced configuration in a microcentrifuge, with cap hinges pointing outward. Centrifuge for one minute at maximum speed to pellet debris.
- Label a clean 1.5-mL tube with your sample number. Transfer 150 μL of the supernatant (clear solution above pellet at bottom of tube) to the fresh tube. Be careful not to disturb the debris pellet when transferring the supernatant. Discard old tube containing the debris.
- Add 3 μL of silica resin to tube; ensure silica resin is mixed and homogenous. Close tube and mix well by flicking or vortexing (solution will turn cloudy, but silica will settle shortly after). Close and incubate the tube for 5 minutes in a water bath or heat block at 57° C.
- Place your tube and those of other groups in a balanced configuration in a microcentrifuge, with cap hinges pointing outward. Centrifuge for 30 seconds at maximum speed to pellet the resin. Use a micropipette with fresh tip to remove all supernatant, being careful not to disrupt the white silica resin pellet at the bottom of the tube.
- Add 500 μL of ice cold wash buffer to the pellet. Mix well by pipetting up and down (or by closing the tube and flicking or vortexing) to resuspend the silica resin.
- Place your tube and those of other groups in a balanced configuration in a microcentrifuge, with cap hinges pointing outward. Centrifuge for 30 seconds at maximum speed to pellet the resin. Use a micropipette with fresh tip to remove all supernatant, being careful not to disrupt the white silica resin pellet at the bottom of the tube.
- Once again, add 500 μL of ice cold wash buffer to the pellet. Close tube and mix well by vortexing or by pipetting up and down to resuspend the silica resin.
- Place your tube and those of other groups in a balanced configuration in a microcentrifuge, with cap hinges pointing outward. Centrifuge for 30 seconds at maximum speed to pellet the silica resin.
- Use a micropipette with fresh tip to remove the supernatant, being careful not to disrupt the white pellet at the bottom of the tube. Spin the tube again for ~15 seconds to collect any drops of supernatant and then remove these with a micropipette.
- Add 100 μL of distilled water (or TE buffer) to the silica resin and mix well by vortexing or by pipetting up and down. Incubate the mixture at 57° C for 5 minutes.
- Place your tube and those of other groups in a balanced configuration in a microcentrifuge, with cap hinges pointing outward. Centrifuge for 30 seconds at maximum speed to pellet the silica resin.
- Label a clean 1.5-mL tube with your sample number. Transfer 50 μL of the supernatant (clear solution) to the fresh tube. Be careful not to disturb the pellet when transferring the supernatant. Discard old tube containing the silica resin.
- Store your sample on ice or at -20° C until you are ready to begin Part III. In Part III, you will use 2 μL of DNA for each PCR reaction. This is a crude DNA extract and contains nucleases that will eventually fragment the DNA at room temperature. Keep the sample cold to limit this activity.
Tissue should be no larger than a grain of rice. Using more than the recommended amount can affect amplification.
Lysis solution dissolves membrane-bound organelles including the nucleus, mitochondria, and chloroplast.
Grinding the tissue breaks up cell walls and other tough material. Once fully ground, the sample should be liquid, but there may be some particulate matter remaining.
Silica resin is a DNA binding matrix that is white. In the presence of the lysis solution the silica resin binds readily to nucleic acids.
Centrifugation pellets the silica resin, which is now bound to nucleic acid. The pellet will appear as a tiny teardrop-shaped smear or particles on the bottom side of the tube underneath the hinge.
Wash buffer removes contaminants from the sample while nucleic acids remain bound to the resin. The silica resin is not soluble in the wash buffer. The silica resin may stay as a pellet or break up during the washing.
Washing twice is much more effective than washing once with twice the volume.
There will be approximately 50 μL of supernatant remaining after the brief spin to be removed. In the presence of water or TE buffer, nucleic acids are eluted from the silica resin.
For long-term storage it is recommended DNA samples be stored in TE buffer (Tris/EDTA). Tris provides a pH 8.0 environment to keep DNA and RNA nucleases less active. EDTA further inactivates nucleases by binding cations required by nucleases.
Transferring silica resin to the PCR reaction in Part III can inhibit the PCR amplification.
Reagents, Supplies, and Equipment
(Volumes and materials for isolating DNA from two samples)
- 10% Chelex Solution (2 tubes of 100 µL)
- 2 Sterile plastic pestles
- 6 Sterile toothpicks or pipette tips
- Tissue sample(s) (from Part I)
- 2 Microcentrifuge tubes (1.5mL)
- 2 Microcentrifuge tube locks
- For sample storage: 95%+ EtOH [Ethanol] (2 tubes of 1000 µL) or freezer
Additional Materials
- Permanent marker
- Mug of boiling water
- Aluminum foil
- Possible: 2 Razor blades, scissor, tweezer, or 2, 10-µL pipette tips for tissue removal from specimen
Pre-isolation preparation: If sample has been stored in 95%+ EtOH prior to DNA isolation, remove the sample from the EtOH using a sterile toothpick and allow it to dry for >10 min on a clean surface. Proceed when sample no longer smells of EtOH.
Ethanol carried through the DNA isolation can inhibit DNA amplification later.
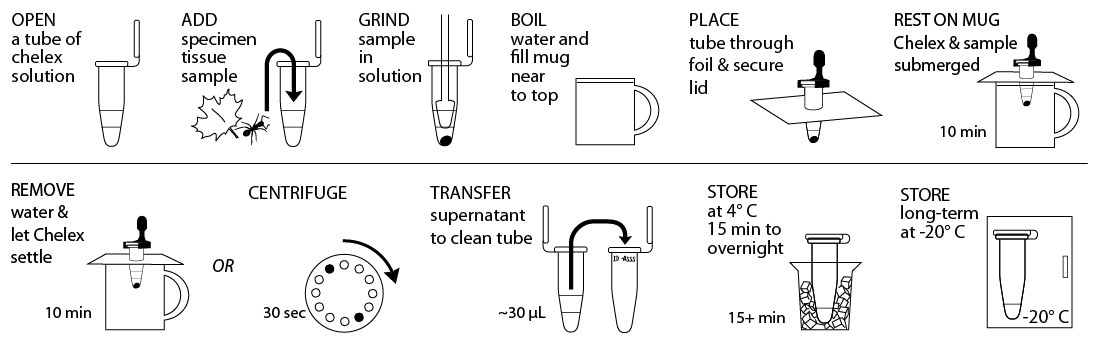
- Obtain tissue ~10 mg or ⅛- to ¼-inch diameter in size by removing a piece of the tissue with a razor blade or sterile tweezer. Some organisms or samples will be small enough that the entire specimen should be used. If you are working with more than one sample, be careful not to cross-contaminate specimens. Be sure to preserve remainder of the organism, as well as additional collected specimens, at -20°C, in 95%+ EtOH, or both.
- Gently tap 10% Chelex solution tube on a hard surface to ensure the solution is at the bottom. Place tissue into Chelex tube labeled with a sample identification number.
- Twist a clean plastic pestle against the inner surface of Chelex tube to forcefully grind the tissue for at least 2 minutes. Use a clean pestle for each sample. Ensure the sample is ground into fine particles. Securely close the cap of the tube.
- Fill a mug nearly to the top with boiling water and cover with aluminum foil. Punch small guide holes in the foil for the number of samples you are processing. Prevent the tube from opening in the following step by using a cap lock to secure the cap to the rim of the tube. Be sure that both the tube rim and cap are held within the cap lock so that steam can’t force the cap open. Place tubes through foil so that the Chelex and sample mixture is fully submerged, but do not submerge the top of the tube.
- Incubate tubes for 10 minutes. It is not necessary to keep water boiling. Alternatively, you can use a water bath or thermocycler to incubate tubes at 95°C for 10 minutes.
- Discard water from mug and return the tubes in foil to the mug. Allow Chelex to settle for an additional 10 minutes. Alternatively, place tubes in a balanced configuration in a microcentrifuge, with cap hinges pointing outward. Centrifuge for 30 seconds at maximum speed to pellet Chelex.
- Carefully transfer ~30 µL of supernatant from the Chelex tube, avoiding the Chelex, into a clean 1.5mL microcentrifuge tube labelled with the sample identification number. This tube can be stored at 4° C temporarily or frozen at -20° C for long-term storage until ready to begin Part III. Alternatively, 2 µL of the supernatant from the Chelex tube can be used directly for future PCR reactions. Do not transfer any of the white Chelex resin along with the supernatant. This is a crude DNA extract and contains nucleases that will eventually fragment the DNA at room temperature. Keep the sample cold to limit this activity.
Tissue should be no larger than a grain of rice. Using more than the recommended amount can inhibit amplification.
Chelex binds positively charged contaminants that could be inhibitors of DNA amplification and binds magnesium ions that are cofactors of DNA nucleases.
Grinding breaks up cell walls and other tough material. Once ground, the sample should be liquid, but there may be some particulate matter remaining.
The heat will help to lyse cell and organelle membranes, releasing the DNA.
Once boiled, the DNA and Chelex mixture can be stored at 4° C temporarily, frozen at -20° C for long-term storage, or shipped at ambient temperature.
Chelex inhibits DNA amplification by PCR.
Reagents
For each group (for isolating DNA from 2 samples)
- Qiagen® DNeasy Blood & Tissue Kit, including:
- Buffer ATL (430 µL)
- Buffer AL (480 µL)
- Proteinase K (50 µL)
- Buffer AW1 (1200 µL)
- Buffer AW2 (1200 µL)
- Buffer AE (240 µL)
- 2 DNeasy Mini spin column plus 4 additional collection tubes (2 mL)
- 96–100% Ethanol (480 µL)*
- Specimen tissue sample(s) (from Part I)
- 4 microcentrifuge tubes (1.5 mL)
Supplies and Equipment
- Container with cracked or crushed ice
- Microcentrifuge
- Micropipettes and tips (2–1000 µL)
- Permanent marker
- Water bath or heating block at 56° C
- Vortexer (optional)
- Microcentrifuge tube rack
- Possible: 2 Razor blades, tweezers, or scissor for tissue removal from specimen
- For sample storage: 96–100% Ethanol or freezer
*additional ethanol needed for initial use of kit
This DNA extraction method uses a commercial kit. Although it is more expensive than the rapid or silica protocol, it has the advantage of working reproducibly with dry and fatty animal specimens. It also works well with fresh animal tissue.
Prior to beginning:
- Buffers ATL and AL may form a precipitate upon storage. If necessary, warm to 56° C until the precipitate has fully dissolved.
- Buffer AW1 and Buffer AW2 are supplied as concentrates. Before using for the first time, add the appropriate amount of 100% ethanol as indicated on the bottle to obtain a working solution.
- Obtain animal tissue ~10 mg or ⅛- to ¼-inch diameter by removing a piece of the tissue with a razor blade, clean tweezers, or scissors to enable efficient lysis. (If you only have one specimen, make a balance tube with the appropriate volume of water for centrifugation steps.)
- Place tissue into a clean 1.5-mL microcentrifuge tube labeled with an identification number.
- Add 180 μL of buffer ATL to each tube. Use different pipette tip for each sample.
- Add 20 μL Proteinase K (20 mg/mL) to each tube. Use a different pipette tip for each sample.
- Thoroughly mix tube for 5 seconds: securely grasp the upper part of the tube, and vigorously hit the bottom end with the index finger of the opposite hand. Alternatively, use a vortex if available.
- Incubate at 56° C for at least one hour (recommended 3 hours to overnight) in a water bath or on a rocking platform (incubator) until the sample is completely lysed. Samples may appear viscous after incubation.
- Remove from incubator and thoroughly mix by hand or vortex (if available) for 15 seconds.
- Add 200 μL of buffer AL to each tube, then mix thoroughly by hand or vortex (if available) for 5 seconds.
- Add 200 μL of 96–100% ethanol to each tube, then mix thoroughly by hand or vortex (if available) for 5 seconds.
- From the mixture in step 7, transfer the entire solution (including precipitate, ~600 μL in total volume) to a DNeasy Mini spin column labeled with the identification number. Spin column should be placed in a 2-mL collection tube.
- Place your tubes in a balanced configuration in a microcentrifuge, with cap hinges pointing outward. Centrifuge for 1 minute at ≥6000 x g (8000 rpm for an Eppendorf mini spin centrifuge).
- Dispose of the collection tube containing the flow-through and put the column in a clean 2-mL collection tube.
- Add 500 μL of buffer AW1 to the spin column.
- Place your tubes in a balanced configuration in a microcentrifuge, with cap hinges pointing outward. Centrifuge for 1 minute at ≥6000 x g (8000 rpm for an Eppendorf mini spin centrifuge).
- Dispose of the collection tube containing the flow-through and put the column in a clean 2-mL collection tube.
- Add 500 μL of buffer AW2 to the spin column.
- Place your tubes in a balanced configuration in a microcentrifuge, with cap hinges pointing outward. Centrifuge 3 minutes at ≥20,000 x g (14,000 rpm for an Eppendorf mini spin centrifuge).
- Dispose of the collection tube containing the flow-through.
- Place spin column in a clean 1.5-mL microcentrifuge tube labeled with the identification number.
- Add 100 μL of buffer AE directly to the center of the the membrane of the spin column.
- Incubate samples for 5 minutes at room temperature.
- Place your tubes in a balanced configuration in a microcentrifuge, with cap hinges pointing outward. Centrifuge 1 minute at ≥6000 x g (8000 rpm for an Eppendorf mini spin centrifuge).
- Discard spin column but keep your 1.5-mL microcentrifuge tube containing the eluted DNA.
- Store your sample on ice or at -20º C until you are ready to begin Part III. In Part III, you will use 2 μL of DNA for each PCR reaction.
Tissue should be no larger than a grain of rice. Using more than the recommended amount can affect amplification.
Lysis solutions ATL and AL open tissues and dissolve membrane bound organelles including the nucleus and mitochondria.
Proteinase K rapidly digests protein, including enzymes that digest DNA.
Nucleic acid pellets are not soluble in ethanol and will not dissolve during washing.
Buffers AW1 and AW2 (step 16) are wash solutions that wash away contaminants from the DNA.
Remove the spin column carefully so it does not come into contact with the flow-through.
Buffer AE elutes the DNA from the spin column membrane into the microcentrifuge collection tube and allows stable storage of the DNA.
Reagents
For each group (for isolating DNA from 2 samples)
- Qiagen® DNeasy Plant Kit, including:
- Buffer AP1 (960 µL)
- RNAse A (10 µL)
- Buffer P3 (320 µL)
- Buffer AW1 (~1620 µL)
- Buffer AW2 (2400 µL)
- Buffer AE (240 µL)
- 2 QIAshredder Mini spin columns
- 1 DNeasy Mini spin column
- 6 2-mL Collection tubes
- 96–100% Ethanol (quantity varies)*
- Specimen tissue sample(s) (from Part I)
- 6 microcentrifuge tubes (1.5 mL)
Supplies and Equipment
- Container with cracked or crushed ice
- Microcentrifuge
- Micropipettes and tips (2–1000 µL)
- Permanent marker
- Plastic pestle
- Water bath or heating block at 42°C and 65°C
- Vortexer (optional)
- Microcentrifuge tube rack
- Possible: 2 Razor blades, tweezers, or scissor
for tissue removal from specimen - For sample storage: 96–100% Ethanol or freezer
*additional ethanol needed for initial use of kit
This DNA extraction method uses a commercial kit. Although it is more expensive than the rapid or silica protocol, it has the advantage of working reproducibly with difficult plant or fungal specimens.
Prior to beginning:
- Buffer AP1 and Buffer AW1 concentrate may form precipitates upon storage. If necessary, warm to 65°C to dissolve (before adding ethanol to Buffer AW1). Do not heat Buffer AW1 after ethanol has been added.
- Buffer AW and Buffer AW1 are supplied as concentrates. Before using for the first time, add the appropriate amount of 100% ethanol as indicated on the bottle to obtain a working solution.
- Make sure the sample is totally dry.
- Obtain plant or fungal tissue ~10 mg or ⅛- to ¼-inch diameter by removing a piece of the tissue with a razor blade, clean tweezers, scissors, or back of a 10-µL pipette tip to enable efficient lysis. (If you only have one specimen, make a balance tube with the appropriate volume of water for centrifuge steps.)
- Place sample in a clean microcentrifuge 1.5-mL tube labeled with an identification number.
- Twist a clean plastic pestle against the inner surface of the 1.5-ml tube to forcefully grind the tissue for 1 minute. Use a clean pestle for each different sample.
- Briefly centrifuge tubes for 15 seconds at maximum speed to disrupt the static electricity.
- Add 400 µL of AP1 and 4 µL of RNase A solution (100 mg/ml). Use a different pipette tip for each sample.
- Securely grasp the upper part of the tube, and vigorously hit the bottom end with the index finger of the opposite hand to ensure the tissue is fully hydrated. Alternatively, vortex (if available) for 5 seconds.
- Incubate for 10 minutes in a 65° C waterbath. Mix by inverting tubes 2 or 3 times during incubation.
- Add 130 µL Buffer P3 to each tube. Use a different pipette tip for each sample. Mix by inverting.
Adding Buffer P3 precipitates detergent, proteins, and polysaccharides.
- Incubate for 5 minutes on ice.
- Centrifuge the lysate for 5 minutes at ≥20,000 x g (14,000 rpm for an Eppendorf mini spin centrifuge).
- Pipette the lysate into a QIAshredder Mini spin column placed in a 2-mL collection tube labeled with the identification number. Use a different pipette tip for each sample.
- Centrifuge for 2 minutes at ≥20,000 x g (14,000 rpm for an Eppendorf mini spin centrifuge).
- Transfer the flow-through into a new microcentrifuge tube without disturbing the pellet if present. You should have about 450 µL flow-through to transfer. In some cases, less flow-through is is recovered. If this happens, determine the volume of flow-through necessary for the next step. Use a different pipette tip for each sample.
- Add 1.5 volumes of Buffer AW1 to the cleared lysate, and mix immediately by pipetting. For example: if 450 µL of lysate is recovered, add 675 µL of Buffer AW1. Adjust the amount of Buffer AW1 according to the volume of lysate recovered.
- Transfer 650 µL of the mixture into a DNeasy Mini spin column placed in a 2-mL collection tube labeled with the identification number. Use a different pipette tip for each sample.
- Centrifuge for 1 minute at ≥6000 x g (8000 rpm for an Eppendorf mini spin centrifuge). Discard the flow through and 2-ml collection tube. Repeat this step with the remaining sample.
- Place the DNeasy Mini spin column into a new 2-ml collection tube labeled with the identification number. Add 500 µL Buffer AW2 to the spin column.
- Centrifuge for 1 minute at ≥6000 x g (8000 rpm for an Eppendorf mini spin centrifuge). Discard the flow through and reuse the collection tube for step 15.
- Add another 500 µL of Buffer AW2. Centrifuge for 2 minutes at ≥20,000 x g (14,000 rpm for an Eppendorf mini spin centrifuge).
- Transfer the DNeasy mini spin column to a new, 1.5-mL microcentrifuge tube labeled with the identification number. Transfer the spin column from the collection tube to the microcentrifuge tube carefully, so the column does not come into contact with the flow-through.
- Add 100 µL of Buffer AE to the center of the DNeasy spin column membrane for elution. Incubate for 5 minutes at room temperature.
- Centrifuge for 1 minute at ≥6000 x g (8000 rpm for an Eppendorf mini spin centrifuge). Discard DNeasy Mini spin column and keep microcentrifuge tube with the eluted DNA.
- Store your samples on ice or at -20°C until you are ready to begin with Part III. In Part III, you will use 2 μL of DNA for each PCR reaction.
Tissue should be no larger than a grain of rice. Using more than the recommended amount can affect amplification.
Grinding the plant tissue breaks up the cell walls. When fully ground, the sample should be a green, fine liquid. There may be some particulate matter remaining.
The enzyme RNase A digests ribonucleic Acid (RNA) that could interfere with PCR.
Remove the spin column from the collection tube carefully so that the column does not come into contact with the flow-through.
Buffer AE elutes DNA from the membrane and allows stable storage of DNA.
